Chapter 6 Web Server
This page describes how to deploy and maintain the web server. As much as we try to streamline this process, deploying our web server on the cloud does require some familiarity with Unix/Linux systems, Docker. We are open for collaboration and may be able to help you deploy your server, so do not hesitate to contact us. First, we describe the general function of the server. Second, we explain how to deploy and test it. Last, for completeness, we provide additional information on the individual components.
General description
Here is a schematics of how these services interact:
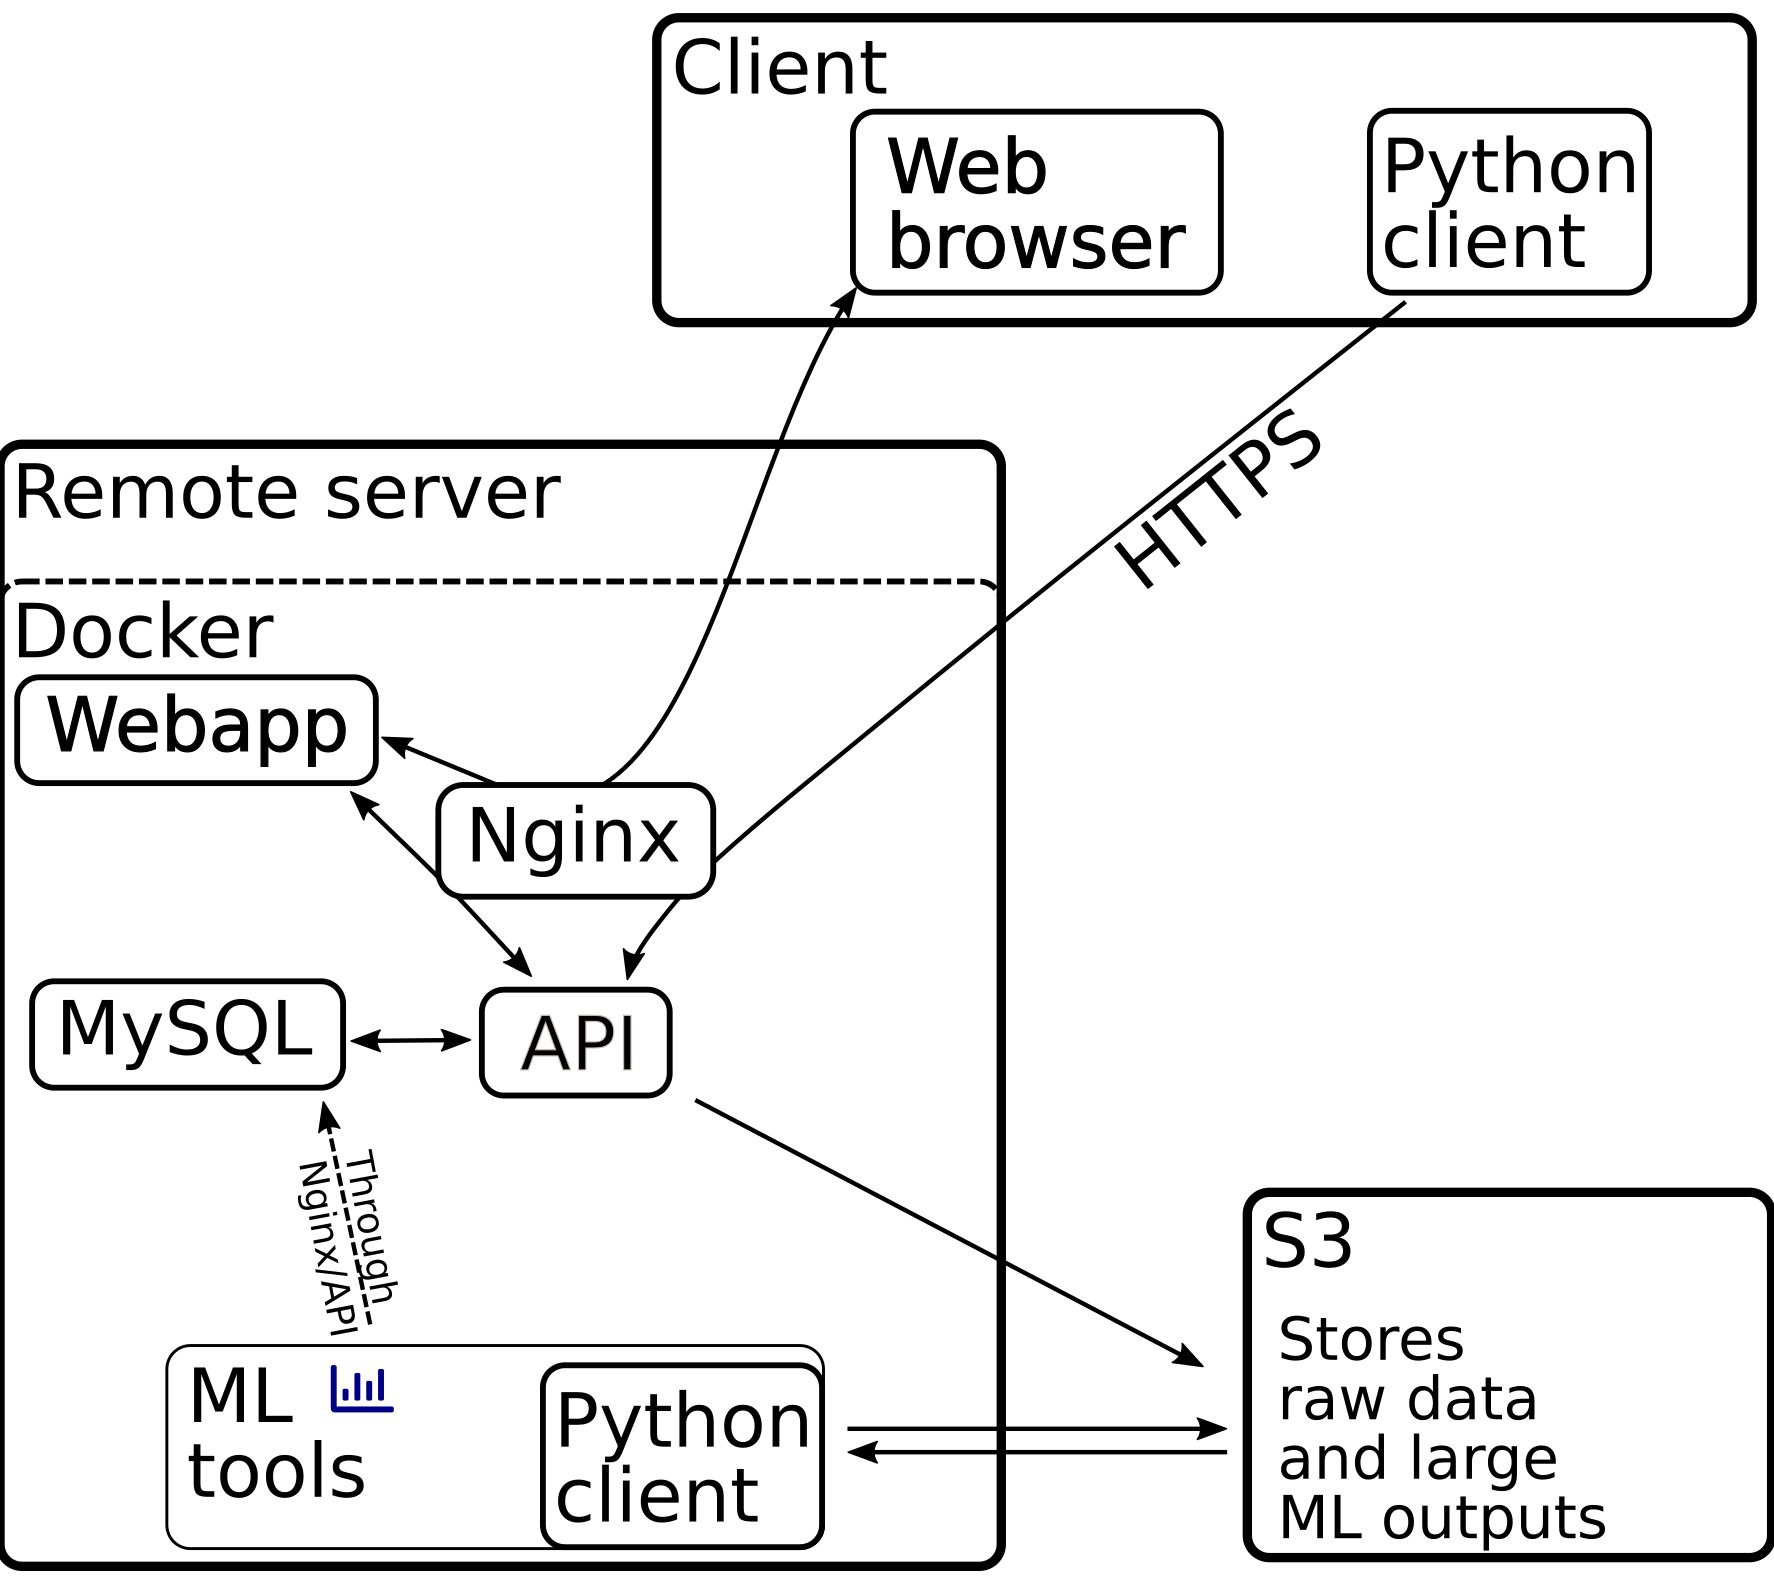
Figure 6.1: Schematics of the web server services
As shown in Figure 6.1, the web server is a suite of docker containers.
The entry point is an Nginx server, spi_nginx, routes requests to the appropriate service:
spi_api<-api.*– our overall API server (i.e. a server that handles client requests to, for instance, upload/download images, create new users, retrieve image metadata, etc).spi_webapp<-webapp.*– an Rshiny web interface to visualize data in real time.spi_s3<-s3.*– an optional local s3 server, using localstack. This is an alternative to subscribe to a commercial s3 server.
The other services are not routed (i.e must not be accessible by external users):
spi_db– a mariadb database that stores image metadata, user data, processing results, …spi_uid– a service that automatically pre-process all images, running the Universal Insect Detector, to segment insects vs background.certbot– a service based on certbot that issues and renews SSL certificates in the background (for HTTPS)
Deployment
Github repository
The all the source code needed for deployment can be found on the sticky-pi-api github repository. It contains two important subdirectories: src, a python package used to create the API, and server, a set of docker services orchestrated with docker compose.
For deployment, we only care about the server – if you are interested, the API is documented on readthedoc, but it should only concern you if you want to take part in development.
Typically, you would clone this repository on your host.
Hosting
The simplest way to deploy the Sticky Pi server stack is on a remote Linux virtual machine. Perhaps your institution provides some cloud hosting, for instance Compute Canada Cloud, or you can opt for a commercial cloud provider. You can also decide to run the server on a custom machine within a restricted network.
Security
A remote web resources implies security considerations:
- Your host should use firewalls, the web-server only needs ports 80 (http) and 443 (https) open
- Ensure you use long, high entropy, passwords
- Update your host system
- Use ssh keys rather than passwords
Configuration and important files
Within the server directory, there are a few noticeable files we will describe:
deploy.sh– A script you can run to deploy the whole stack. More details later.docker-compose.yml– The base docker-compose configuration file.docker-compose.prod.yml– The specification of the above file, for production..env– An overall configuration file defining. You will need to modify some variables in it..secret.env– Contains credentials. For security reasons, this file does not exist yet you need to create it. Do not share this file, and ensure the permissions are restrictive.
.env file
You need to create a directory that will contain all the server data (except the s3-hosted files). Set LOCAL_VOLUME_ROOT in the .env file accordingly: LOCAL_VOLUME_ROOT=/your/sticky-pi/root/dirctory.
In order to encrypt data flow between client and server, we enforce https. That implies the registration of a domain name. Typically, you want to:
- Ensure your cloud provider can provide a static/floating IP address for your instance, say
111.112.113.114. - Find a DNS provider and register your domain name, say
sticky.net. - Use your DNS provider to create two A records:
sticky.net->111.112.113.114and*.sticky.net->111.112.113.114 - Define
ROOT_DOMAIN_NAMEin the.envfile to your registered domain name. E.g.ROOT_DOMAIN_NAME=sticky.net
.secret.env file
Create or add to .secret.env file the variables by modifying this template:
# En encryption key can be any long sting of ascii characters,
# e.g.  something like `cfbewif7y8rfy4w3aNIKFW9Yfh89HFN9`
SECRET_API_KEY=

# Your S3 host. We will describe further the difference between
# external and local S3 provider
# For local option we can set
# S3_HOST=s3.${ROOT_DOMAIN_NAME}
# for remote option this would be a hostname like `my-s3.provider.com`
S3_HOST=

# For local s3 option, you want to define arbitrary keys:
# e.g. S3_ACCESS_KEY=fnwfnoAEVikenAV and
# S3_PRIVATE_KEY=cfweavb87eabv8uehabv98hwAW7
# For remote option, you will need to issue a key pair and paste it
S3_ACCESS_KEY=
S3_PRIVATE_KEY=

# An arbitrary password, only used internally
# Should be more than 10-characters long
MYSQL_PASSWORD=

# Another arbitrary password, only used internally
# Should be more than 10-characters long
API_ADMIN_PASSWORD=

# Your email address (or the main admin's)
ADMIN_EMAIL=

# The name of the S3 bucket storing the images
# and other binary files. E.g. `sticky-pi-prod`
S3_BUCKET_NAME=

# An arbitrary password for the special user/internal bot `uid`,
# which can preprocess images automatically (universal insect detector).
# Should be more than 10-characters long
UID_PASSWORD=
Alternative local S3 server
Our recommended option is to use an external provider for S3.
However, you can also run your own S3 as a docker container.
To do that you just need to set S3_HOST=s3.${ROOT_DOMAIN_NAME} in the .secret.env file.
Your data will be stored, by default on ${LOCAL_VOLUME_ROOT}/s3.
Beware that overall data can be large – typically [1, 2] GB per device per week.
Deploy script
Once we have set up the environment variables, we are ready to deploy. For convenience, we provide a script: server/deploy.sh that should be used this way for a production server:
# sh deploy.sh prod-init
# sh deploy.sh prod
prod-init initializes SSL certificates. You should need to do that only once.
If you want to subsequently restart/redeploy the server, just run sh deploy.sh prod.
The first time, it may take a wile to build all the docker images.
Once all the images have been built, ensure containers are running using docker ps. you can also debug and check the logs by using docker logs <service_name>.
Check the API
The simplest way to test the API end to end is to use cURL – you could also use our python client.
For instance, we can ask the API to issue a temporary logging token for the admin user.
Replace <API_ADMIN_PASSWORD> and <ROOT_DOMAIN_NAME> by their value (same as in .secret.env).
curl --user admin:<API_ADMIN_PASSWORD> -X POST https://api.<ROOT_DOMAIN_NAME>/get_tokenThis should return a json dictionary with the fields "expiration" and "token". If this does not work, stop here, and debug.
Create users
We can also use cURL to create users.
For instance, to create a read only user named spi, with password R3ad_0nly, and no email address, we can run:
curl --user admin:<API_ADMIN_PASSWORD> -X POST -H "Content-Type: application/json" -d '[{"username": "spi", "password": "R3ad_0nly", "is_admin": 0, "email": "", "can_write":0}]' https://api.<ROOT_DOMAIN_NAME>/put_users"can_write":1 would create a user that can write, and "is_admin": 1, an admin user (e.g. that can create other users).
Note that you will not be able to retrieve a user’s password as passwords are internally encrypted. If a password is lost, the only way to log in is to reset it.
You can list users with:
curl --user admin:<API_ADMIN_PASSWORD> -X POST https://api.sticky-pi.com/get_usersYou can test users by requesting a token, using curl as above, replacing --user admin:<API_ADMIN_PASSWORD>, by --user <USERNAME>:<USER_PASSWORD>.
Backups
The raw image data is on the s3 server. Manual backups/archives can be done by downlaoding all data to a separate resource/hard drive/… with tools such as s3cmd, using your credentials. In order to backup mariadb, you can use the deploy script:
#sh deploy.sh mysql-backupThis will create a file like spi_db.dump.YYYY-MM-DD.sql.gz in the current working directory – that you then manually copy/archive. In case of catastrofic failure, the database could be restored with it.
Additional information
Database
The database (spi_db) is the stock MariaDB.
The database data is mounted on a persistent directory on the host: ${LOCAL_VOLUME_ROOT}/mysql in the host maps /var/lib/mysql in the container.
Nginx
Nginx (spi_nginx) is the stock Nginx.
We use a custom configuration file to define routing (nginx/nging.conf-template).
Note that this is a template file where we inject environment variable at built time.
You should not need to modify the configuration file for standard deployment
API
The API (spi_api) is a uwsgi + flask server. The main file is api/app.py.
This server depends extensively on our python package, sticky_pi_api.
Note that the API and client are packaged together, which allows us to use mock local API vs remote API.
Universal Insect Detector
The UID (spi_uid) is a simple python script (ml/uid.py) that uses the API client and the our sticky_pi_ml package.
It fetches the images that are not annotated (or obsolete) from client, analyse them, and upload the results (to the database, through the API).
This process runs automatically. Note that you need to have either trained the UID or download a reference model for this service to work. We explain how to set-up ML resources in a dedicated section.
Webapp
The Webapp (spi_webapp) is an Rshiny interactive website.
It is mainly designed to visualise image and processing data.
Typically hundreds of images are acquired every week, this interface allows you to select a date range to display a plot of environmental conditions and overlay images as well as UID results. This is very helpful to ensure the quality of your data in real time. The webapp will be available at webapp.<ROOT_DOMAIN_NAME>, as defined in hosting.